介绍
CountDownLatch用于某个线程等待其他线程执行完任务再执行,与thread.join()功能类似。常见的应用场景是开启多个线程同时执行某个任务,等到所有任务执行完再执行特定操作,如汇总统计结果。
主要功能:
- 等待事件完成:通过 await()方法,线程可以等待其他线程完成某些操作。
- 递减计数器:其他线程在完成各自的任务后,通过调用 countDown()方法将计数器减 1。
- 线程同步:当计数器变为 0 时,所有调用了await()的线程将被唤醒并继续执行。
面试题:如何能够保证T2在T1执行完后执行,T3在T2执行完后执行?
join方法
可以使用join方法解决这个问题。比如在线程A中,调用线程B的join方法表示的意思就是: A等待B线程执行完毕后(释放CPU执行权),再继续执行。
public class RunnableJob {
    public static void main(String[] args) throws InterruptedException {
        Worker runnableJob = new Worker();
        Thread t1 = new Thread(runnableJob, "T1");
        Thread t2 = new Thread(runnableJob, "T2");
        Thread t3 = new Thread(runnableJob, "T3");
        t1.start();
        //这里就是在main主线程中,调用t1线程的join方法。
        //也就是main主线程要等待t1执行完成后才能继续往下执行
        t1.join();
        t2.start();
        t2.join();
        t3.start();
        t3.join();
        System.out.println("主线程执行完毕----");
    }
}
class Worker implements Runnable{
    public void run() {
        Thread thread = Thread.currentThread();
        try {
            Thread.sleep(1000);
            System.out.println(thread.getName()+"正在执行");
        } catch (InterruptedException e) {
            e.printStackTrace();
        }
    }
}

//输出
T1正在执行
T2正在执行
T3正在执行
主线程执行完毕----
CountDownLatch
倒计时计数器
CountDownLatch用于某个线程等待其他线程执行完任务再执行,可以被认为是加强版的join()。
public class CountDownLatchTest {
    public static void main(String[] args) {
        final CountDownLatch countDownLatch = new CountDownLatch(3);
        new Thread("T1"){
            public void run() {
                try {
                    Thread.sleep(3000);
                    System.out.println(Thread.currentThread().getName()+"正在执行");
                    countDownLatch.countDown();
                } catch (InterruptedException e) {
                    e.printStackTrace();
                }
            };
        }.start();
        new Thread("T2"){
            public void run() {
                try {
                    Thread.sleep(3000);
                    System.out.println(Thread.currentThread().getName()+"正在执行");
                    countDownLatch.countDown();
                } catch (InterruptedException e) {
                    e.printStackTrace();
                }
            };
        }.start();
        new Thread("T3"){
            public void run() {
                try {
                    Thread.sleep(3000);
                    System.out.println(Thread.currentThread().getName()+"正在执行");
                    countDownLatch.countDown();
                } catch (InterruptedException e) {
                    e.printStackTrace();
                }
            };
        }.start();
        System.out.println("等待三个线程执行完,主线程才能执行");
        try {
            //调用await()方法的线程会被挂起,它会等待直到count值为0才继续执行;
            //或者等待timeout时间后count值还没变为0的话也会继续执行
            countDownLatch.await();
//            countDownLatch.await(20000, TimeUnit.MILLISECONDS);
        } catch (InterruptedException e) {
            e.printStackTrace();
        }
        System.out.println("主线程执行完毕");
    }
}

//输出
等待三个线程执行完,主线程才能执行
T1正在执行
T3正在执行
T2正在执行
主线程执行完毕
调用了await后,主线程被挂起,它会等待直到count值为0才继续执行;因此只影响主线程的执行顺序一定要在T1 T2 T3之后,但T1 T2 T3之间的顺序互不影响
应用场景: 开启多个线程同时执行某个任务,等到所有任务执行完再执行特定操作,如汇总统计结果。
两者区别
相同点:都能等待一个或者多个线程执行完成操作,比如等待三个线程执行完毕后,第四个线程才能执行
不同点:join能让线程按我们预想的的顺序执行,比如线程1执行完了,线程2才能执行,线程2执行完,线程3才能执行,但是CountDownLatch就做不到.
当调用CountDownLatch的countDown方法时,N就会减1,CountDownLatch的await方法会阻塞当前线程,直到N变为零(也就是线程都执行完了),由于countDown方法可以用在任何地方,所以这里说的N个点,可以是N个线程,也可以是1个线程里的N个执行步骤。用在多线程时,只需把这个CountDownLatch的引用传递到线程中即可
工作原理
其底层是由AQS提供支持,所以其数据结构可以参考AQS的数据结构,而AQS的数据结构核心就是两个虚拟队列: 同步队列sync queue 和条件队列condition queue,不同的条件会有不同的条件队列。
CountDownLatch对AQS的共享方式实现为:CountDownLatch 将任务分为N个子线程去执行,将 state 初始化为 N, N与线程的个数一致,N个子线程是井行执行的,每个子线程都在执行完成后 countDown() 1次, state 执行 CAS 操作并减1。在所有子线程都执行完成(state=0)时会unpark()主线程,然后主线程会从 await()返回,继续执行后续的动作。

CountDownLatch源码分析
类的继承关系
CountDownLatch没有显示继承哪个父类或者实现哪个父接口, 它底层是AQS是通过内部类Sync来实现的。
public class CountDownLatch {}
类的内部类
CountDownLatch类存在一个内部类Sync,继承自AbstractQueuedSynchronizer,其源代码如下。
private static final class Sync extends AbstractQueuedSynchronizer {
    // 版本号
    private static final long serialVersionUID = 4982264981922014374L;

    // 构造器
    Sync(int count) {
        setState(count);
    }

    // 返回当前计数
    int getCount() {
        return getState();
    }

    // 试图在共享模式下获取对象状态
    protected int tryAcquireShared(int acquires) {
        return (getState() == 0) ? 1 : -1;
    }

    // 试图设置状态来反映共享模式下的一个释放
    protected boolean tryReleaseShared(int releases) {
        // Decrement count; signal when transition to zero
        // 无限循环
        for (;;) {
            // 获取状态
            int c = getState();
            if (c == 0) // 没有被线程占有
                return false;
            // 下一个状态
            int nextc = c-1;
            if (compareAndSetState(c, nextc)) // 比较并且设置成功
                return nextc == 0;
        }
    }
}
说明: 对CountDownLatch方法的调用会转发到对Sync或AQS的方法的调用,所以,AQS对CountDownLatch提供支持。
类的属性
可以看到CountDownLatch类的内部只有一个Sync类型的属性:
public class CountDownLatch {
    // 同步队列
    private final Sync sync;
}
类的构造函数
public CountDownLatch(int count) {
    if (count < 0) throw new IllegalArgumentException("count < 0");
    // 初始化状态数
    this.sync = new Sync(count);
}
说明: 该构造函数可以构造一个用给定计数初始化的CountDownLatch,并且构造函数内完成了sync的初始化,并设置了状态数。
核心函数 - await函数
此函数将会使当前线程在锁存器倒计数至零之前一直等待,除非线程被中断。其源码如下
public void await() throws InterruptedException {
    // 转发到sync对象上
    sync.acquireSharedInterruptibly(1);
}
说明: 由源码可知,对CountDownLatch对象的await的调用会转发为对Sync的acquireSharedInterruptibly(从AQS继承的方法)方法的调用。
- acquireSharedInterruptibly源码如下:
public final void acquireSharedInterruptibly(int arg)
        throws InterruptedException {
    if (Thread.interrupted())
        throw new InterruptedException();
    if (tryAcquireShared(arg) < 0)
        doAcquireSharedInterruptibly(arg);
}
说明: 从源码中可知,acquireSharedInterruptibly又调用了CountDownLatch的内部类Sync的tryAcquireShared和AQS的doAcquireSharedInterruptibly函数。
- tryAcquireShared函数的源码如下:
protected int tryAcquireShared(int acquires) {
    return (getState() == 0) ? 1 : -1;
}
说明: 该函数只是简单的判断AQS的state是否为0,为0则返回1,不为0则返回-1。
- doAcquireSharedInterruptibly函数的源码如下:
private void doAcquireSharedInterruptibly(int arg) throws InterruptedException {
    // 添加节点至等待队列
    final Node node = addWaiter(Node.SHARED);
    boolean failed = true;
    try {
        for (;;) { // 无限循环
            // 获取node的前驱节点
            final Node p = node.predecessor();
            if (p == head) { // 前驱节点为头节点
                // 试图在共享模式下获取对象状态
                int r = tryAcquireShared(arg);
                if (r >= 0) { // 获取成功
                    // 设置头节点并进行繁殖
                    setHeadAndPropagate(node, r);
                    // 设置节点next域
                    p.next = null; // help GC
                    failed = false;
                    return;
                }
            }
            if (shouldParkAfterFailedAcquire(p, node) &&
                parkAndCheckInterrupt()) // 在获取失败后是否需要禁止线程并且进行中断检查
                // 抛出异常
                throw new InterruptedException();
        }
    } finally {
        if (failed)
            cancelAcquire(node);
    }
}
说明: 在AQS的doAcquireSharedInterruptibly中可能会再次调用CountDownLatch的内部类Sync的tryAcquireShared方法和AQS的setHeadAndPropagate方法。
- setHeadAndPropagate方法源码如下。
private void setHeadAndPropagate(Node node, int propagate) {
    // 获取头节点
    Node h = head; // Record old head for check below
    // 设置头节点
    setHead(node);
    /*
        * Try to signal next queued node if:
        *   Propagation was indicated by caller,
        *     or was recorded (as h.waitStatus either before
        *     or after setHead) by a previous operation
        *     (note: this uses sign-check of waitStatus because
        *      PROPAGATE status may transition to SIGNAL.)
        * and
        *   The next node is waiting in shared mode,
        *     or we don't know, because it appears null
        *
        * The conservatism in both of these checks may cause
        * unnecessary wake-ups, but only when there are multiple
        * racing acquires/releases, so most need signals now or soon
        * anyway.
        */
    // 进行判断
    if (propagate > 0 || h == null || h.waitStatus < 0 ||
        (h = head) == null || h.waitStatus < 0) {
        // 获取节点的后继
        Node s = node.next;
        if (s == null || s.isShared()) // 后继为空或者为共享模式
            // 以共享模式进行释放
            doReleaseShared();
    }
}
说明: 该方法设置头节点并且释放头节点后面的满足条件的结点,该方法中可能会调用到AQS的doReleaseShared方法,其源码如下。
private void doReleaseShared() {
    /*
        * Ensure that a release propagates, even if there are other
        * in-progress acquires/releases.  This proceeds in the usual
        * way of trying to unparkSuccessor of head if it needs
        * signal. But if it does not, status is set to PROPAGATE to
        * ensure that upon release, propagation continues.
        * Additionally, we must loop in case a new node is added
        * while we are doing this. Also, unlike other uses of
        * unparkSuccessor, we need to know if CAS to reset status
        * fails, if so rechecking.
        */
    // 无限循环
    for (;;) {
        // 保存头节点
        Node h = head;
        if (h != null && h != tail) { // 头节点不为空并且头节点不为尾结点
            // 获取头节点的等待状态
            int ws = h.waitStatus;
            if (ws == Node.SIGNAL) { // 状态为SIGNAL
                if (!compareAndSetWaitStatus(h, Node.SIGNAL, 0)) // 不成功就继续
                    continue;            // loop to recheck cases
                // 释放后继结点
                unparkSuccessor(h);
            }
            else if (ws == 0 &&
                        !compareAndSetWaitStatus(h, 0, Node.PROPAGATE)) // 状态为0并且不成功,继续
                continue;                // loop on failed CAS
        }
        if (h == head) // 若头节点改变,继续循环
            break;
    }
}
说明: 该方法在共享模式下释放。
所以,对CountDownLatch的await调用大致会有如下的调用链。
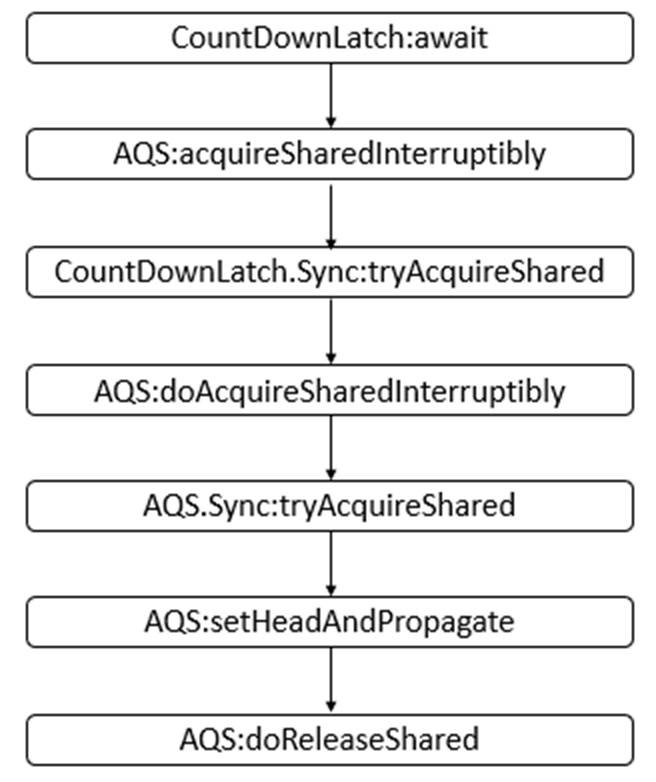
说明: 上图给出了可能会调用到的主要方法,并非一定会调用到
核心函数 - countDown函数
此函数将递减锁存器的计数,如果计数到达零,则释放所有等待的线程
public void countDown() {
    sync.releaseShared(1);
}
说明: 对countDown的调用转换为对Sync对象的releaseShared(从AQS继承而来)方法的调用。
- releaseShared源码如下
public final boolean releaseShared(int arg) {
    if (tryReleaseShared(arg)) {
        // 当state状态为0了,才会执行这里
        doReleaseShared();
        return true;
    }
    return false;
}
说明: 此函数会以共享模式释放对象,并且在函数中会调用到CountDownLatch的tryReleaseShared函数,并且可能会调用AQS的doReleaseShared函数。
- tryReleaseShared源码如下
protected boolean tryReleaseShared(int releases) {
    // Decrement count; signal when transition to zero
    // 无限循环
    for (;;) {
        // 获取状态
        int c = getState();
        if (c == 0) // 没有被线程占有
            return false;
        // 下一个状态
        int nextc = c-1;
        if (compareAndSetState(c, nextc)) // 比较并且设置成功
            return nextc == 0;
    }
}
说明: 此函数会试图设置状态来反映共享模式下的一个释放。具体的流程在下面的示例中会进行分析。
- AQS的doReleaseShared的源码如下
private void doReleaseShared() {
    /*
        * Ensure that a release propagates, even if there are other
        * in-progress acquires/releases.  This proceeds in the usual
        * way of trying to unparkSuccessor of head if it needs
        * signal. But if it does not, status is set to PROPAGATE to
        * ensure that upon release, propagation continues.
        * Additionally, we must loop in case a new node is added
        * while we are doing this. Also, unlike other uses of
        * unparkSuccessor, we need to know if CAS to reset status
        * fails, if so rechecking.
        */
    // 无限循环
    for (;;) {
        // 保存头节点
        Node h = head;
        if (h != null && h != tail) { // 头节点不为空并且头节点不为尾结点
            // 获取头节点的等待状态
            int ws = h.waitStatus;
            if (ws == Node.SIGNAL) { // 状态为SIGNAL
                if (!compareAndSetWaitStatus(h, Node.SIGNAL, 0)) // 不成功就继续
                    continue;            // loop to recheck cases
                // 释放后继结点
                unparkSuccessor(h);
            }
            else if (ws == 0 &&
                        !compareAndSetWaitStatus(h, 0, Node.PROPAGATE)) // 状态为0并且不成功,继续
                continue;                // loop on failed CAS
        }
        if (h == head) // 若头节点改变,继续循环
            break;
    }
}
说明: 此函数在共享模式下释放资源。
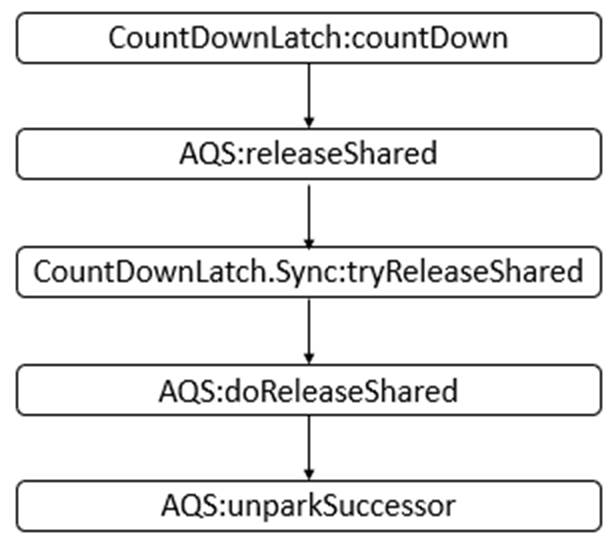
所以,对CountDownLatch的countDown调用大致会有如下的调用链
示例
下面给出了一个使用CountDownLatch的示例。
import java.util.concurrent.CountDownLatch;

class MyThread extends Thread {
    private CountDownLatch countDownLatch;

    public MyThread(String name, CountDownLatch countDownLatch) {
        super(name);
        this.countDownLatch = countDownLatch;
    }

    public void run() {
        System.out.println(Thread.currentThread().getName() + " doing something");
        try {
            Thread.sleep(1000);
        } catch (InterruptedException e) {
            e.printStackTrace();
        }
        System.out.println(Thread.currentThread().getName() + " finish");
        countDownLatch.countDown();
    }
}

public class CountDownLatchDemo {
    public static void main(String[] args) {
        CountDownLatch countDownLatch = new CountDownLatch(2);
        MyThread t1 = new MyThread("t1", countDownLatch);
        MyThread t2 = new MyThread("t2", countDownLatch);
        t1.start();
        t2.start();
        System.out.println("Waiting for t1 thread and t2 thread to finish");
        try {
            countDownLatch.await();
        } catch (InterruptedException e) {
            e.printStackTrace();
        }
        System.out.println(Thread.currentThread().getName() + " continue");
    }
}
运行结果(某一次):
Waiting for t1 thread and t2 thread to finish
t1 doing something
t2 doing something
t1 finish
t2 finish
main continue
说明: 本程序首先计数器初始化为2。根据结果,可能会存在如下的一种时序图。
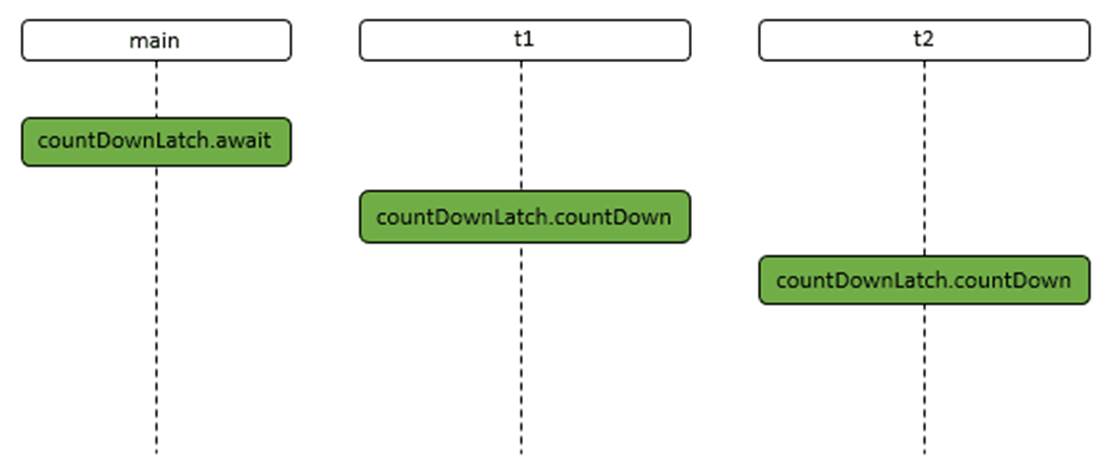
说明: 首先main线程会调用await操作,此时main线程会被阻塞,等待被唤醒,之后t1线程执行了countDown操作,最后,t2线程执行了countDown操作,此时main线程就被唤醒了,可以继续运行。下面,进行详细分析。
- main线程执行countDownLatch.await操作,主要调用的函数如下。
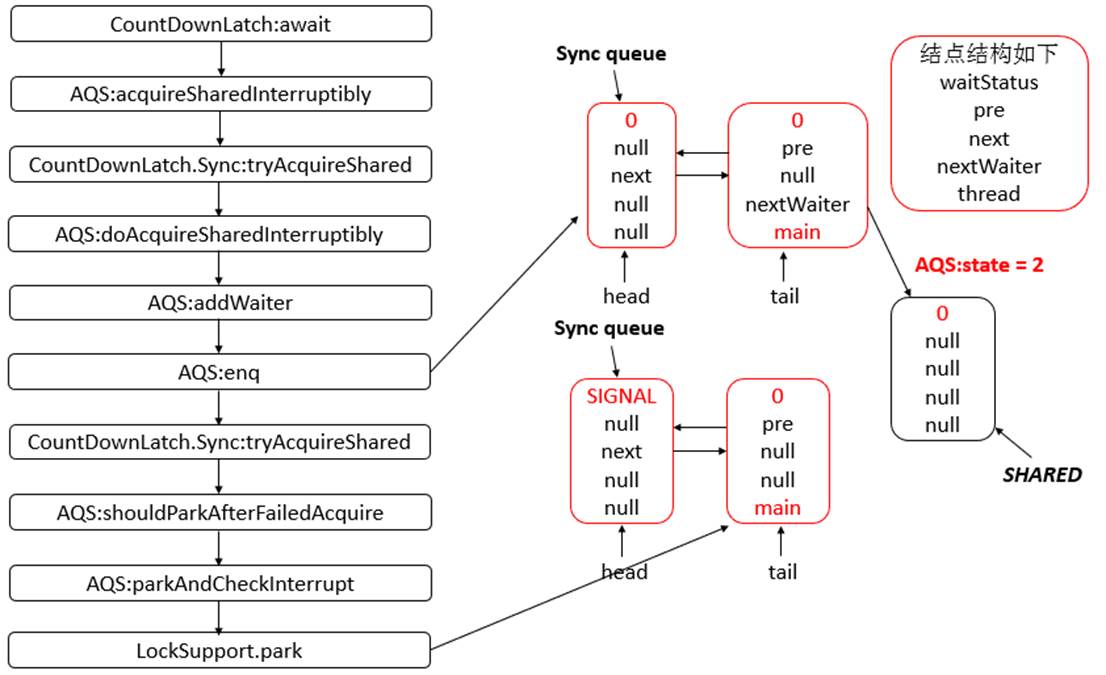
说明: 在最后,main线程就被park了,即禁止运行了。此时Sync queue(同步队列)中有两个节点,AQS的state为2,包含main线程的结点的nextWaiter指向SHARED结点。
- t1线程执行countDownLatch.countDown操作,主要调用的函数如下。

说明: 此时,Sync queue队列里的结点个数未发生变化,但是此时,AQS的state已经变为1了。
- t2线程执行countDownLatch.countDown操作,主要调用的函数如下。

说明: 经过调用后,AQS的state为0,并且此时,main线程会被unpark,可以继续运行。当main线程获取cpu资源后,继续运行。
- main线程获取cpu资源,继续运行,由于main线程是在parkAndCheckInterrupt函数中被禁止的,所以此时,继续在parkAndCheckInterrupt函数运行。
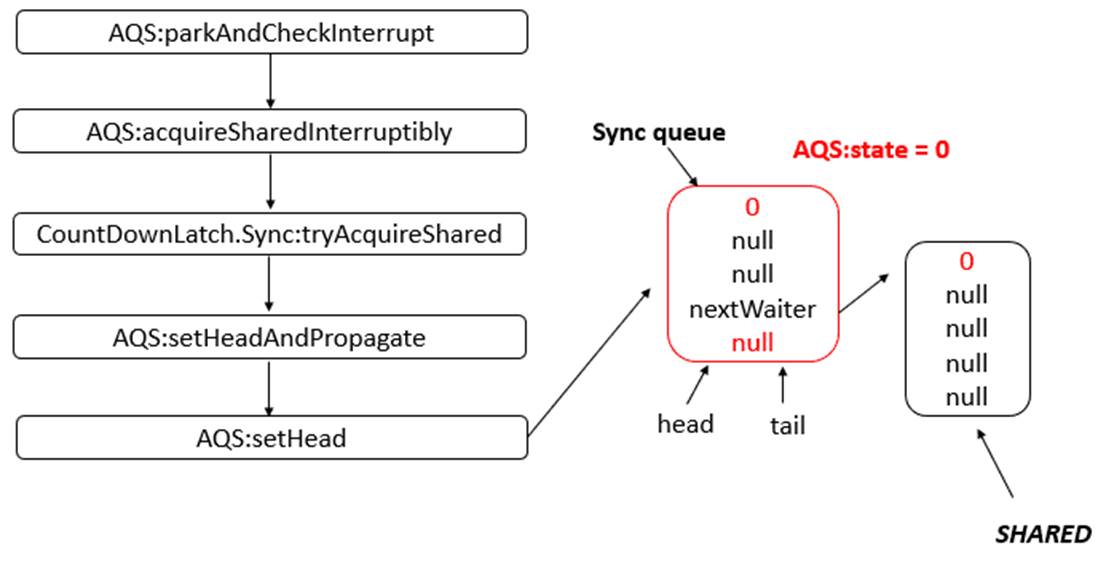
说明: main线程恢复,继续在parkAndCheckInterrupt函数中运行,之后又会回到最终达到的状态为AQS的state为0,并且head与tail指向同一个结点,该节点的额nextWaiter域还是指向SHARED结点